[Archived] Type-safe GraphQL Server with Pothos (Formerly GiraphQL)


Omkar Kulkarni / February 06, 2022
11 min read • ––– views


Caution
This article is over 2 years old.
🏆 This article is featured on Hashnode! Yay! 🏆
GraphQL is amazing. If your project leverages TypeScript, combined with right tools, you can achieve end-to-end type-safety throughout backend and frontend. We will take a look at Pothos. A plugin based schema builder for GraphQL servers.
Why do I need type-safety in my code ?
The very first reason that I can think of is, autocompletion through IDE. With Typescript, you can leave guessing at bay and confidently write code. Not only that, it allows teams to catch bugs (well, most of them :P) before they hit production.
Speaking in context of GraphQL servers, you would always want a single source of truth. GraphQL and TypeScript both have types, but they have small differences.
TS + codegen can help you configure a single source of truth. Codegen is a tool by which you can generate typescript types from your GraphQL schema. And you can configure it to type your react hooks as well! (Not the scope of this tutorial though.)
The GraphQL ecosystem
There are basically two approaches to writing GraphQL servers, viz. Schema First and Resolver First. We will write a server that follows resolver first approach.
When it comes to GraphQL in javascript world, the apollo team has pretty much unified the scenario by building all the right tools. We will make use of apollo-server package in our tutorial. It is lightweight and enough to get us started.
What is Pothos GraphQL ?
Pothos embraces typescript's type-inference and strong type-system to build GraphQL schemas. It comes with a lot of plugins which you can use according to your needs. Right from auth to databases, it has them all the stones!
What will we build?
We will build an GraphQL API that would manage our Todos! I personally feel, to learn any new framework, a todo app gives the most general overview about that framework. So we will build a todo API with which we can create todos, retrieve a particular todo, and list out all our todos.
Let's begin
Create an empty project with this command.
bashyarn init -y
We will go ahead and configure our typescript configuration. We will require nodemon for this setup. So make sure you install nodemon as a global dependency.
bashnpm install -g nodemon
For Typescript, create a tsconfig.json file and add the following snippet.
json{
  "compilerOptions": {
    "target": "es2019",
    "module": "commonjs",
    "lib": ["ESNext"],
    "sourceMap": true,
    "outDir": "build",
    "rootDir": "./",
    "strict": true,
    "noImplicitAny": true,
    "strictNullChecks": true,
    "noImplicitThis": true,
    "resolveJsonModule": true,
    "alwaysStrict": true,
    "removeComments": true,
    "noImplicitReturns": true,
    "esModuleInterop": true,
    "allowSyntheticDefaultImports": true,
    "experimentalDecorators": true,
    "emitDecoratorMetadata": true,
    "skipLibCheck": true
  },
  "exclude": ["./node_modules/*", "build"]
}
Create a folder named src in the project and create an index.ts file in it. You can add the following code.
tsconsole.log('Hi!!');
Running the server
Make sure to add these scripts to package.json
json"scripts": {
		"dev": "nodemon src/index.ts",
		"build": "tsc",
		"start": "node build/src/index.js"
	},
Adding dependencies
Let's get the dependencies installed now. Run the following code in your terminal
bashyarn add apollo-server graphql @pothos/core
The great thing about Pothos is, it does not add any runtime strain on our server! How cool is that!
Creating an instance of Pothos Builder
The very first thing we would need is, creating a pothos builder. This builder is a function which is required to initialize pothos with options like plugins, etc SchemaBuilder is the core class of Pothos. It can be used to build types, and merge them into a graphql.js Schema.
Create a file named builder.ts in your src folder and add the following snippet.
tsimport SchemaBuilder from '@pothos/core';

export const builder = new SchemaBuilder({});

// This will create an empty Query {} and Mutation{} type in our SDL
// schema.
builder.queryType({});
builder.mutationType({});
Creating our schema!
For apollo server, we need to provide a schema. A GraphQL schema is a description of the data clients can request from a GraphQL API.
Let us go ahead and create a schema script that, compiles our resolver first code, into something that apollo server understands, that is, a GraphQL SDL Schema. So create a file named schema.ts
ts// src/schema.ts

import path from 'path';
import fs from 'fs';
import { printSchema, lexicographicSortSchema } from 'graphql';

import { builder } from './builder';

// the toSchema() method converts our resolver first code into a SDL // schema
export const schema = builder.toSchema({});

const schemaAsString = printSchema(lexicographicSortSchema(schema));

// we will write this schema to a file.
if (process.env.NODE_ENV !== 'production') {
  fs.writeFileSync(path.join(process.cwd(), './schema.gql'), schemaAsString);
}
Bootstrapping our Apollo Server
Come back to the src/index.ts and add the following snippet.
as you can see, we import the schema script we just created and provide it to the Apollo Server options. We are not particularly interested in other options for the sake of simplicity.
ts//src/index.ts
import { ApolloServer } from 'apollo-server';
import { schema } from './schema';

const server = new ApolloServer({
  schema
});

// TIP: its good if you put the port number in .envs!, but not needed right now.
server.listen(3000).then(() => {
  console.log(`
		Server started on http://localhost:3000/graphql
	`);
});
Creating TODO resolvers
Okay, so we are at the heart of this tutorial, let us create a todoResolver.ts file in src folder. And add the following code
ts// we import our builder
import { builder } from './builder';

// we tell builder to create a field under mutation that is named
// createTodo.
builder.mutationField('createTodo', (t) =>
  t.field({
    // this is the return type of our resolver. You can return
    // numbers, strings, boolean, etc
    type: 'String',

    // the resolver function -> this fx is called when this mutation is
    // invoked
    resolve: () => 'Hello World'
  })
);

// we tell builder to create a field under query field that is named
// getTodos.
builder.queryField('getTodos', (t) =>
  t.field({
    type: 'String',
    resolve: () => 'Hello World'
  })
);
Now the only thing remaining is, importing this resolver before our schema is compiled.
So go back to the src/schema.ts file and add this import just before exporting schema.
Your schema.ts should look like this:
ts//src/schema.ts
import path from 'path';
import fs from 'fs';
import { printSchema, lexicographicSortSchema } from 'graphql';

import { builder } from './builder';
// Don't forgot to do this !!
import './todoResolver';

export const schema = builder.toSchema({});

const schemaAsString = printSchema(lexicographicSortSchema(schema));

if (process.env.NODE_ENV !== 'production') {
  fs.writeFileSync(path.join(process.cwd(), './schema.gql'), schemaAsString);
}
Testing time!
Okay! If you have come along this far, have yourself a cookie! Let us run our server by running
bashyarn dev
If you have followed steps correctly, it should run an apollo server on port 3000.
Click this link to see the apollo studio explorer GraphQL Server
⚠ Server did not boot ? Make sure
- Typescript is at the latest version
- You have correctly installed all deps
- You have followed all the steps
Adding the simple objects plugin.
For defining shape of a Todo object, we will need a SimpleObjects plugin
So run
bashyarn add @pothos/plugin-simple-objects
and add it to the plugins section of the builder
tsimport SimpleObjectsPlugin from '@pothos/plugin-simple-objects';

// src/builder.ts
export const builder = new SchemaBuilder({
  plugins: [SimpleObjectsPlugin]
});
Creating a todo.
For the sake of simplicity, I have not included database connectivity in this tutorial. I feel, once you understand the framework barebones, adding additional functionality is really easy.
Let's give info to our builder about the TODO object.
ts//src/todoResolver.ts

const Todo = builder.simpleObject('Todo', {
  description: 'This is a Todo object with ID, title and completed boolean!',
  fields: (t) => ({
    // unique ID of our TODO
    id: t.int(),
    // title of the todo
    title: t.string(),
    // whether it is completed or not.
    completed: t.boolean()
  })
});
This Todo object now allows us to return a TODO object shape. Let us learn about it.
We will modify our queryField a bit to return a simple todo.
ts/src/Rdeelooorstv.ts;

builder.queryField('getTodo', (t) =>
  t.field({
    // we provide the return type as `Todo`!
    type: Todo,
    resolve: () => {
      return {
        // press ctrl + space and see the sweet autocomplete
        id: 1,
        completed: false,
        title: 'test'
      };
    }
  })
);
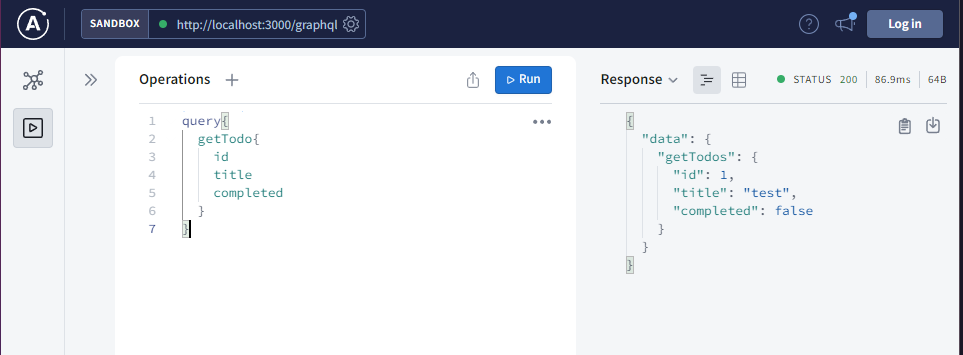
save the file, and head to Apollo Studio to test it. Run the following query to get a todo.
graphqlquery {
  getTodo {
    id
    title
    completed
  }
}
If you have followed so far, have a cookie! you should see this output in studio
Create queries and mutations
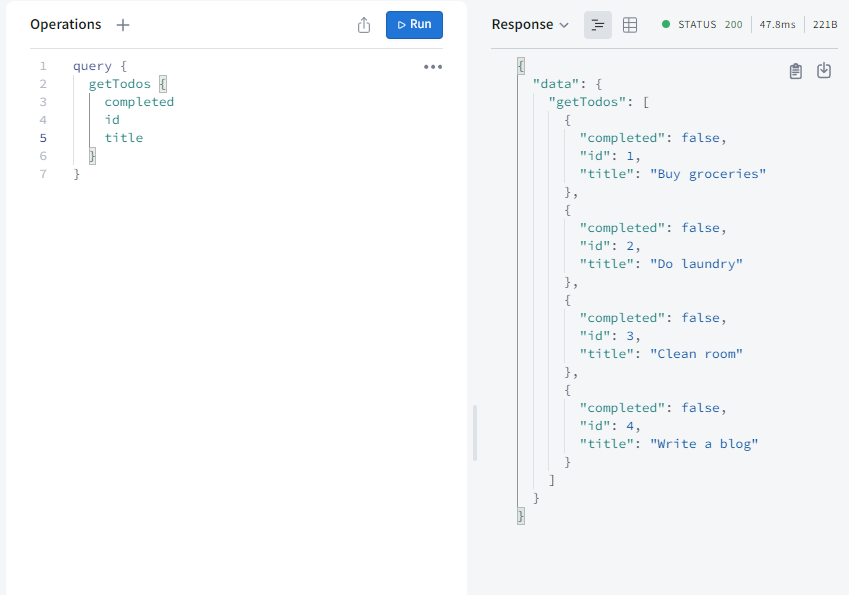
Get all TODO list
ts// define this array in the todoResolver file
const TODOS = [
  {
    id: 1,
    title: 'Buy groceries',
    completed: false
  }
  // add more
];

builder.queryField('getTodos', (t) =>
  t.field({
    // wrap Todo around square brackets to denote that
    // it returns array of todos.
    type: [Todo],
    resolve: () => {
      return TODOS;
    }
  })
);
You should see the following response
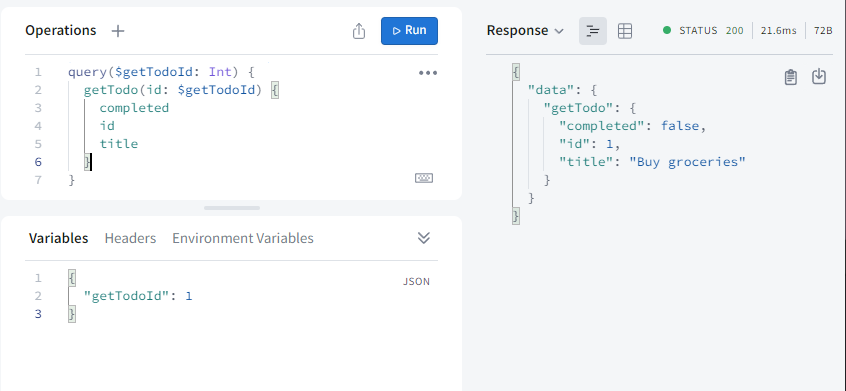
Get a particular TODO.
This is useful in context of rendering a todo detail page.
tsbuilder.queryField('getTodo', (t) =>
  t.field({
    // we return a single todo from this resolver
    type: Todo,
    // since there is a chance that todo may not exist, we make this
    // field to be able to return null values as well.
    nullable: true,
    // we expect user to provide a ID as input. With pothos, we have the ability to provide types for our inputs as well! Here, we expect id field to be a number/integer
    args: { id: t.arg.int() },
    resolve: (_parent, args, _ctx) => {
      return TODOS.find((x) => x.id === args.id);
    }
  })
);
Run this query
graphqlquery ($todoID: Int) {
  getTodo(id: $todoID) {
    completed
    id
    title
  }
}
Provide a todoID in the apollo studio variables section!
Create a todo!
We will learn about mutations in this section. A mutation is write operation (not necessarily write to be strict but usually) on the data. Here we will insert a todo object in our TODOS array.
tsbuilder.mutationField('createTodo', (t) =>
  t.field({
    type: [Todo],
    args: {
      title: t.arg.string({ required: true }),
      completed: t.arg.boolean({ required: true })
    },
    // here we don't care about parent query or the context. So I attached underscore to silence
    // TS Complier
    resolve: (_parent, args, _context) => {
      TODOS.push({
        id: TODOS.length + 1,
        title: args.title,
        completed: args.completed
      });

      return TODOS;
    }
  })
);
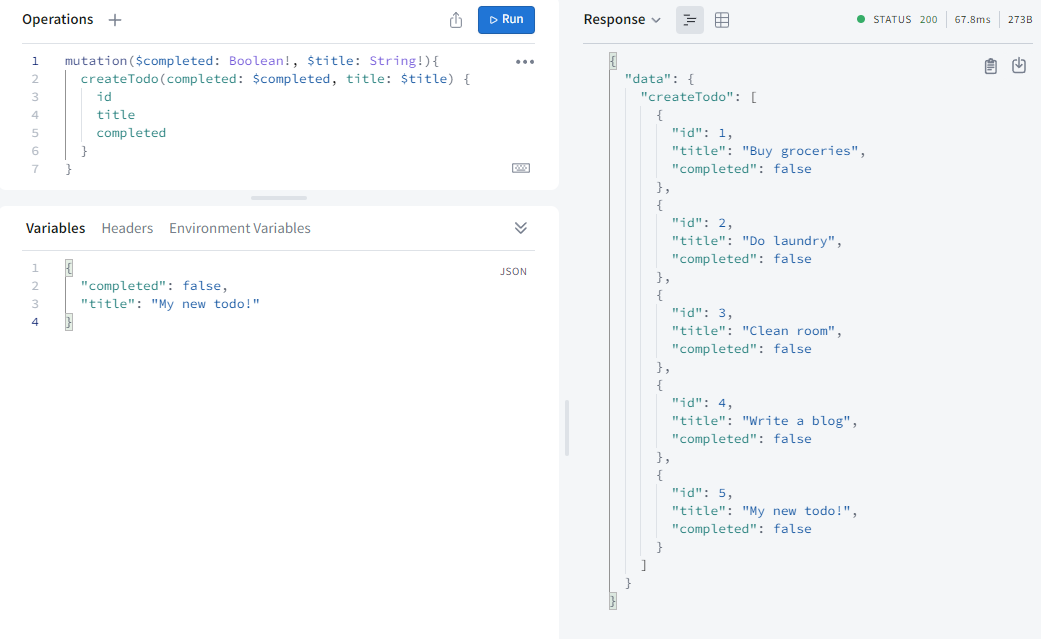
Run the following mutation
graphqlmutation ($completed: Boolean!, $title: String!) {
  createTodo(completed: $completed, title: $title) {
    id
    title
    completed
  }
}
and provide variables in the apollo studio variables section
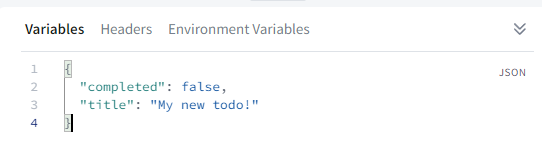
Click Run (Ctrl + Enter) and boom! your mutation returns a list of all todos! Including the one we just added.
Toggle TODO completion status
So you want to mark the todo with ID 2 as completed,
tsbuilder.mutationField('toggleCompleted', (t) =>
  t.field({
    type: Todo,
    nullable: true,
    args: { id: t.arg.int({ required: true }) },
    resolve: (_parent, args, _ctx) => {
      const todo = TODOS.find((x) => x.id === args.id);
      if (!todo) return null;

      todo.completed = !todo.completed;
      //  try returning a string here :P The IDE would immediately give you type-error.
      return todo;
    }
  })
);
Run the following mutation in apollo studio
graphqlmutation ($todoId: Int!) {
  toggleCompleted(id: $todoId) {
    completed
    id
    title
  }
}
Provide todoId
json{
  "todoId": 1
}
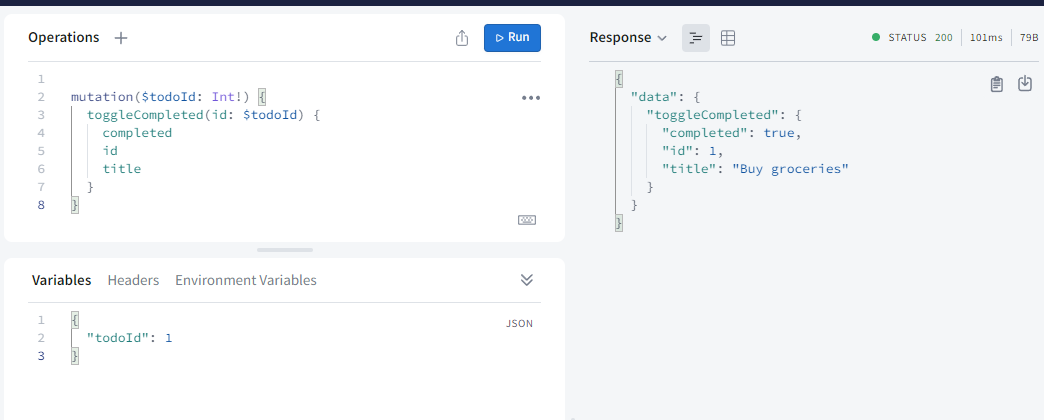
Yay! Our todo is now complete.
Refer code
You can refer the code here Github
Verdict
So we learnt how easy it is to write a GraphQL server with the help of Pothos. It takes care of return types, argument types and more than that. Pothos works amazing with Prisma an amazing ORM for PostgreSQL.
If you loved the tutorial, do let me know on Twitter !
If you are facing troubles/difficulty setting up, please let me know as well.
Till then, ta-ta! Take care!! and enjoy GraphQL 😎